Handy Instruction Manual
29Graphic Instructions
The following will introduce the basic instructions used to display graphics.
Graphic Screen and Coordinates
In this product, graphics are drawn on the graphic screen, which is a screen existing behind the console screen.
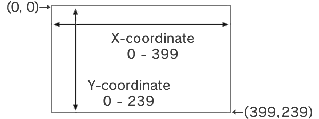
The graphic screen has a resolution of 400 horizontal dots x 240 vertical dots, which are handled as X-coordinates and Y-coordinates respectively.

Try Using Graphic Instructions
First of all, let's input a simple graphic instruction in DIRECT mode to draw a straight line on the screen. Of course, you can also write this instruction as a program in EDIT mode.
◆Draw a straight line (GLINE instruction)
Please input the following:

The GLINE instruction is used to draw a straight line on the graphic screen.
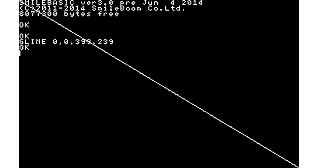
The execution result will be as follows:

A line crossing the screen diagonally is displayed.
| Format | GLINE Start point X, Start point Y, End point X, End point Y, Color
|
|---|---|
| Usage example | GLINE 0, 0, 399, 239 Draws a straight line from the start point (0, 0) to the end point (399,239). |
◆Clear the graphic screen (GCLS instruction)
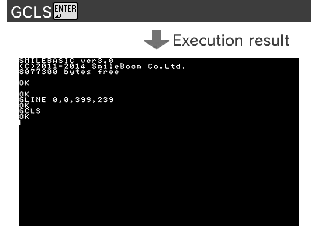
The CLS instruction cannot be used to clear contents drawn on the graphic screen. In order to do so, you should instead use the "GCLS" instruction.
| Format | GCLS Clear the graphic screen |
|---|
* In this product, instructions beginning with G generally relate to the graphic screen.

Only the line has disappeared; the characters have not.
The console screen and the graphic screen are managed separately. The CLS instruction only clears the console screen, while the GCLS instruction only clears the graphic screen.
If you want to read about the structure of the screen in more detail, please refer to the "Screen Structure" page.
About Colors
Some graphic instructions, such as the GLINE instruction, allow you to specify the drawing color. Colors can be specified in multiple ways. If you have experience with graphics software, it should be easy to specify colors using RGB.
◆How to specify colors using RGB
In this color specification method, each of the three additive primary colors (Red (R), Green (G) and Blue (B)) are specified by a value in the range 0-255.
For example, bright red is expressed as follows:

The following color specifications are close to the eight basic colors used in early computers. If you use them as a base and modify each of the values, you can create more natural-looking colors.
Black■ RGB(0,0,0)
Red■ RGB(255,0,0)
Green■ RGB(0,255,0)
Blue■ RGB(0,0,255)
Yellow■ RGB(255,255,0)
Light Blue■ RGB(0,255,255)
Purple■ RGB(255,0,255)
White■ RGB(255,255,255)
◆GCOLOR instruction
The GCOLOR instruction specifies the color of subsequent graphics that are drawn.
| Format | GCOLOR Color code
|
|---|---|
| Usage example | GCOLOR RGB(255,0,0) This specifies that subsequent graphics will drawn in a red color. |
Other Graphic Instructions
The following will introduce some of the instructions used to draw basic figures, such as quadrangles and circles. For more instructions, please refer to the pages on the sample programs and the instruction list.
◆GPSET instruction - Plot a dot
| Format | GPSET X-coordinate, Y-coordinate, Color code
|
|---|---|
| Usage example | GPSET 199,119 |
◆GBOX instruction - Draw a quadrangle
| Format | GBOX Start point X, Start point Y, End point X, End point Y, Color
|
|---|---|
| Usage example | GBOX 0,0,100,80 |
◆GFILL instruction - Draw a quadrangle and fill it with a color
| Format | GFILL Start point X, Start point Y, End point X, End point Y, Color
|
|---|---|
| Usage example | GFILL 110,40,50,20 |
◆GCIRCLE instruction - Draw a circle
| Format | GCIRCLE Center X, Center Y, Radius, Color
|
|---|---|
| Usage example | GCIRCLE 110,40,50,20 |
◆GPAINT instruction - Fill the inside of a figure with a color
| Format | GPAINT Start X, Start Y, Fill color, Border color
|
|---|---|
| Usage example | GPAINT 110, 40, RGB(0,255,255) This fills an area with light blue, starting from the specified coordinates (110,40) and stopping when a color other than the base color is reached |
e-manual.pdf (3.0 MB)
Contents
- 1
Basic Information
- 2345678
Introduction
- 9About SmileBASIC
- 10Using SmileBASIC
- 11About BASIC
- 12About the TOP MENU
- 13Projects in the Cloud
- 14Managing Projects / Files
- 15Options
Create Programs
- 16Starting BASIC
- 17Using the Keyboard
- 18What is DIRECT Mode?
- 19Writing in EDIT Mode
- 20Features in EDIT Mode
- 21Managing Programs
- 22About Sample Programs
- 23Using the HELP Tool
- 24Using the SMILE Tool
Introduction to BASIC
- 25"PRINT" and Variables
- 26Using Variables
- 27Conditional Judgment
- 28Computer Colors (RGB)
- 29Graphic Instructions
- 30Sound Instructions
Further Information
- 31
- 323D Effects
- 33Screen Layout
- 34BG (Backgrounds)
- 35Sprites
- 36
