
Handy Instruction Manual
35Sprites
While the BG provides the still backdrop for games, sprites allow the creation of moving objects such as player and enemy characters, bullets, and so forth.
About Sprites
Like the BG, sprites are also a commonly used structure in console games.
Sprite images are displayed on-screen as single moving objects. The standard size for an image is 16x16 dots, but this can be changed to any size. Up to 512 sprites can be displayed on-screen. However, displaying too many at one time will cause slowdown.
In this product, various different sprite images that are commonly used in games are predefined. Using the SPSET instruction, these can be assigned to a sprite created with an arbitrary management number. They can then be displayed on screen by executing the SPSHOW instruction.

◆Sprite characters
The sprite images are preloaded in the GRP4 graphic page. Although the basic size of an image is 16x16 dots, you can also use other sizes.
To check image definition numbers, please press "SPDEF" from the SMILE tool.
◆Displaying sprites on-screen
Using the SPSET instruction, you can prepare up to 512 sprites to display. Specify the image definition number to assign to each sprite number.
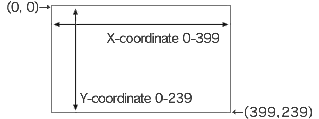
Use the SPOFS instruction to specify the display coordinates of a sprite in dot units. This is different from BG coordinates, which are specified in tile units.
You can also change the order in which sprites are superimposed by specifying the Z-coordinate. This coordinate is treated in the same way as the Z-coordinate in the BG, so it is also possible to display sprites in front of, or hidden behind, the BG.
The Z-coordinate also affects depth in 3D views.
Prepare a Sprite - SPSET Instruction
Use this instruction to prepare a sprite to display on the screen. Assign a management number in order to identify this sprite from the others, and select an image to use for the sprite.
| Format | SPSET Management number, Image definition number
|
|---|---|
| Usage example | SPSET 0,1
This prepares sprite No. 0 and sets image 1 (an orange) as its appearance |
The SPSET instruction prepares the target sprite in memory and displays it on the screen. (If you do not wish to display it, use the SPHIDE instruction.)
Change the Display Location of a Sprite - SPOFS Instruction
This instruction is used to change the display location and depth of a specified sprite. This is often used to move game characters.
| Format | SPOFS Management number, X, Y, Z
|
|---|---|
| Usage example | SPOFS 0, 192, 112
This displays sprite No. 0 near the center of the screen. |
Scale a Sprite Up/Down - SPSCALE Instruction
This instruction is used to scale up or scale down a specified sprite.
| Format | SPSCALE Management number, Magnification X, Magnification Y
|
|---|---|
| Usage example | SPSCALE 0, 1.5, 1.5
This increases the size of sprite No. 0 by 1.5 times vertically and horizontally. |
Rotate a Sprite - SPROT Instruction
This instruction is used to rotate a specified sprite.
| Format | SPROT Management number, Angle
|
|---|---|
| Usage example | SPROT 0, 30
This rotates sprite No. 0 by 30 degrees clockwise |
Change the base point of a sprite - SPHOME instruction
This instruction is used to change the base point of a sprite when moving it, scaling it up or down, or rotating it. In the initial state, the base point of a sprite is its top left corner.
| Format | SPHOME Management number, Base point X, Base point Y
|
|---|---|
| Usage example | SPHOME 0, 8, 16
This moves the base point of sprite No. 0 by 8 dots to the right and 16 dots downwards from its top left corner. |
Other Sprite Instructions
There are many other sprite instructions. Please refer to HELP and the sample programs for information on how they are used. The following are the other main instructions.
◆SPHIDE instruction
Hides a sprite
◆SPSHOW instruction
Shows a hidden sprite
◆SPANIM instruction
Performs sprite animation
◆SPLINK instruction
Links multiple sprites to produce a multi-jointed character
◆SPUNLINK instruction
Releases the link made with the SPLINK instruction
◆SPCLR instruction
Stops using a specified sprite and releases the memory
e-manual.pdf (3.0 MB)
Contents
- 1
Basic Information
- 2345678
Introduction
- 9About SmileBASIC
- 10Using SmileBASIC
- 11About BASIC
- 12About the TOP MENU
- 13Projects in the Cloud
- 14Managing Projects / Files
- 15Options
Create Programs
- 16Starting BASIC
- 17Using the Keyboard
- 18What is DIRECT Mode?
- 19Writing in EDIT Mode
- 20Features in EDIT Mode
- 21Managing Programs
- 22About Sample Programs
- 23Using the HELP Tool
- 24Using the SMILE Tool
Introduction to BASIC
- 25"PRINT" and Variables
- 26Using Variables
- 27Conditional Judgment
- 28Computer Colors (RGB)
- 29Graphic Instructions
- 30Sound Instructions
Further Information
- 31
- 323D Effects
- 33Screen Layout
- 34BG (Backgrounds)
- 35Sprites
- 36